How to Carry Concealed with a Tucked in Shirt: 8 Techniques for Comfort & Concealment
How to carry concealed with a tucked in shirt requires choosing the right holster and carry position to maintain comfort and concealment. Positioning an inside-the-waistband (IWB) holster at strong-side 3:30 to 4 o’clock provides reliable concealment for most situations. Starting with a quality tuckable holster designed to minimize printing greatly improves your chances of staying discreet.
Key Takeaways
- Use a tuckable inside-the-waistband holster to keep the firearm close and prevent shirt bulges.
- Strong-side carry at 3:30 to 4 o’clock balances concealment, comfort, and drawing ease for tucked shirts.
- Consider appendix carry (1 to 2 o’clock) for faster draws, but expect less comfort if worn long periods.
- Wearing a jacket consistently enables effective use of a shoulder holster beneath a tucked shirt.
- Select a belt rated for concealed carry, typically 1.5 inches wide with reinforced stiffness to support your firearm.
- Opt for shirts with enough looseness and heavier fabric to reduce printing over your holster.
Choosing the Best Holster for Tucked-In Shirt Carry

Choosing the right holster makes all the difference when carrying concealed with a tucked-in shirt. You need a holster designed to keep your gun secure, allow quick access, and prevent printing beneath your shirt. Not all holsters fit this need, especially with tucked shirts, so understanding tuckable holsters versus other types helps you pick what suits your body and wardrobe best.
Inside-the-Waistband Tuckable Holsters
Inside-the-waistband (IWB) holsters built specifically for tuck-in carry come with unique clip designs that create a small gap between the holster and your pants. This gap lets the shirt fabric slip easily between them, hiding the holster’s outline under a tucked shirt. The clip’s geometry prevents the clip or holster body from distorting your shirt’s silhouette, which reduces printing.
These holsters also offer strong firearm retention, usually with molded shells or adjustable retention screws, so your gun stays put during movement. Adjustable cant angles and ride heights are common, letting you position the holster for comfort and fast, consistent draws. This makes IWB tuckable holsters a top choice in formal settings where you wear dress shirts or business attire.
| Holster Model | Tuckability | Main Limitation |
|---|---|---|
| Hidden Hybrid Holsters IWB | Yes, tuckable IWB | Double Clip design can require precise adjustment |
| Tulster Oath Holster | Yes, tuckable IWB | Optic-ready but may be bulkier on smaller handgun models |
| Independence IWB Leather Holster | Yes, tuckable IWB | Molded leather fits specific firearm models |
| We The People Pocket Holster | No, clipless IWB/pocket | Not for fully tucked shirt concealment |
Choosing among these depends on your handgun model, your body shape, and how much you prioritize draw speed versus absolute concealment. Some prefer a strong-side position (3:30, 4 o’clock) for comfort and concealment, while others opt for appendix carry (1, 2 o’clock) if body type and garment fit allow.
Belly Band and Holster Shirt Alternatives
Belly band holsters wrap around the waist beneath your tucked shirt and hold the firearm tightly against your body. They work for some but can slow down your draw and reduce retention security compared to IWB tuckable holsters. The lack of fixed belt clips means your gun’s placement might shift, making consistent draws tricky, especially over many hours of wear in professional environments.
Holster undershirts provide a concealment pocket built into a compression base layer worn under your dress shirt. This method keeps the entire carry system under the tucked shirt without relying on belt clips. While excellent for reducing printing, these undershirts typically reduce draw speed and are better for times when concealment needs outweigh quick access, such as long meetings or formal occasions.
Pocket Holsters and Their Limits Under a Tucked Shirt
Pocket holsters are a different category and generally not designed for tucked-in shirt carry. These holsters rely on the pocket fabric itself to secure the firearm, with either no clips or clipless designs. Since the holster is inside the pocket, and the shirt is tucked into the pants, the holster and firearm sit below the level of the waistband, which means the holster does not interact with the shirt fabric like tuckable IWB holsters do.
Because of this placement, pocket holsters do not provide the clean tuckable clip gap needed to pass the shirt fabric between holster and pants. They offer good retention and concealment for casual or relaxed settings when untucked shirts or jackets cover the pocket area. However, wearing a fully tucked shirt over a pocket holster usually reduces concealment quality and limits your ability to keep the shirt smoothly tucked around the firearm.
Optimal Carry Positions for Tucked-In Concealed Carry
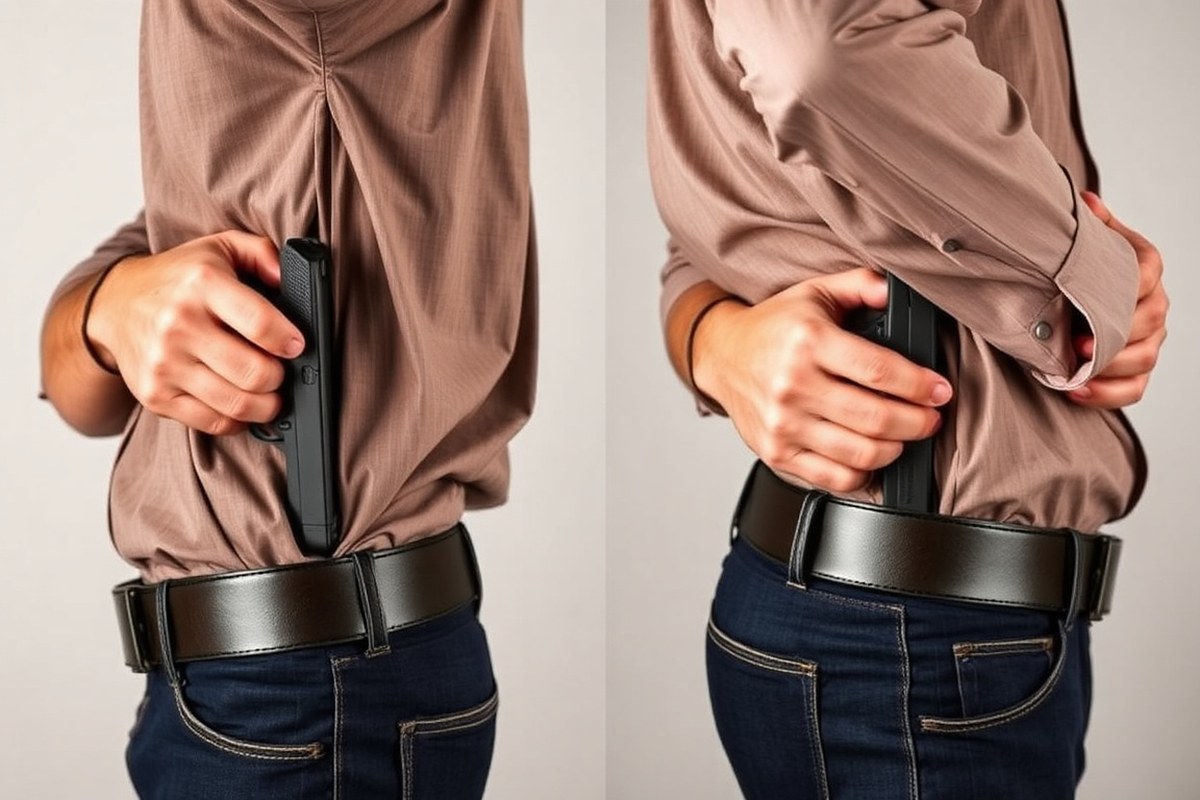
The best carry position under a tucked shirt balances concealment, comfort, and draw speed. Appendix carry (1 to 2 o’clock) offers quicker access and better concealment with tailored shirts but can be less comfortable when seated for long periods. Strong-side carry (3:30 to 4 o’clock) trades some draw speed for improve comfort during extended wear and easier concealment by angling the grip forward. Your body shape and activity levels dictate the ideal location and holster cant to reduce printing and maintain swift access.
Strong-Side IWB Carry (3:30 to 4 O’clock)
Strong-side inside-the-waistband (IWB) carry is the most common and suits those who wear tucked-in dress shirts or polos daily. Position the holster just behind your hip, near 3:30 to 4 o’clock, for a natural, comfortable fit that aligns with your waist and hip movement. This positioning allows wearing a belt comfortably without forcing excessive tightness, which can hinder draw speed.
For concealment, angle the holster with a 10 to 15 degree forward cant to let the grip follow the natural orientation of your forearm. This inward rotation lets you pull the firearm more straight up and forward while reducing printing risks by tucking the grip closer to your body silhouette.
- Place holster at 3:30 to 4 o’clock on your dominant side
- Use a 10-15° forward cant to align grip with forearm
- Select a holster with a concealment claw or inward-rotating clips
- Wear a sturdy belt rated for concealed carry to prevent sagging
- Avoid overly tight shirt tucks that restrict hand movement
- Test sitting and standing positions to evaluate comfort and printing
Comfort is generally better here during long periods of standing or sitting, but quick draw speed is slightly slower than appendix carry due to the turning motion required to clear the holster. Body shape affects concealment: a narrower waist or more pronounced hips may cause printing unless the grip is angled correctly.
Test your draw while seated at work or in a car to ensure the belt and holster setup won’t interfere with comfort or speed.
Appendix Carry (1 to 2 O’clock)
Appendix inside-the-waistband (AIWB) carry is popular when tucked shirts are involved because it lets you draw quickly in confined spaces like office cubicles, cars, or meetings. Carrying around 1 to 2 o’clock (right-handed) keeps the firearm easily accessible with minimal body rotation. Swift access provides an advantage if you need to respond rapidly without large movements.
Concealment is improve with a tuckable holster featuring a concealment claw that rotates the grip inward, avoiding printing under slim-fit or dress shirts. Comfort is usually adequate for short periods, but extended sitting may cause discomfort due to pressure on sensitive areas.
- Choose a tuckable AIWB holster designed for dress shirts
- Use a concealment claw or inward rotating clips to hide grip profile
- Test your seated comfort, especially if you work at a desk
- Adjust shirt fit and thickness to reduce printing
- Practice draw to ensure smooth access without shirt interference
- Consider holster retention adjustments for safe but accessible carry
Body shape plays a larger role here. Leaner individuals often have an easier time concealing appendix carry, while those with larger midsections may find the position less comfortable. Avoid appendix carry if sitting for extended hours causes discomfort or if your daily activities involve a lot of bending.
Use a dedicated tuckable holster with adjustable retention and claw features to maximize concealment under a tucked shirt in appendix carry.
Other Positions and When to Use Them
While strong-side and appendix remain the most practical for tucked-in shirts, other carry locations exist but have drawbacks. Off-side carry (around 8 to 9 o’clock) places the holster on the support hand side, which is less intuitive for draw and can be slower, but it may work for left-handed individuals or those with limited right-side options.
Small of back carry is rarely recommended under tucked shirts due to comfort and safety concerns; it risks spinal injury in falls or impacts and is harder to conceal with tucked dress clothing. Belly carry positions (centered at 12 o’clock) offer concealment but limit draw speed and can interfere with sitting or leaning forward.
- Off-side carry offers concealment but slower access
- Small of back carry is least comfortable and less safe in daily wear
- Belly carry may print more under fitted shirts and reduce draw efficiency
- Choose these only when typical positions are not feasible
- Always test concealment and draw mechanics in real clothing and postures
Select these alternative positions only if your body shape, injury history, or work environment limits traditional carry options. Test printing risks by moving and sitting to confirm concealment. Use holsters specifically designed for the chosen area to maintain retention and comfort.
Avoid small of back carry if your job requires frequent sitting or wearing dress pants with a tucked shirt to minimize safety and concealment issues.
Selecting the Right Belt for Concealed Carry Under a Tucked Shirt
Choose a belt that is between 1.5 to 1.75 inches wide for reliable concealed carry under a tucked-in shirt. The width must precisely match the holster clip or loop dimensions to ensure a secure fit. Belt stiffness matters equally; a rigid belt holds your holster in place, prevents sagging, and maintains firearm position throughout the day. Look for belts with reinforced cores made from materials like nylon or steel embedded between leather layers or sturdy synthetic fabrics designed specifically for concealed carry.
Belt thickness directly affects how well your holster clips seat and retain. If the belt is too thin, clips may slide or fail to grip properly, posing safety risks. Conversely, belts that are too thick might not fit holster clips made for slimmer profiles. Belt thickness typically ranges from 3 to 5 millimeters; your goal is to match that thickness to the clip specifications provided by the holster manufacturer. Some holster clips fit only certain belt types, so universal clip sizes are a myth; always verify compatibility before purchasing.
To check belt and clip compatibility, measure the exact width and thickness of your belt using a ruler or caliper. Compare those measurements to the clip’s holding dimensions, often found in the product description or by contacting the manufacturer. Next, install the holster on the belt and test for secure attachment without excessive play or wiggle. Make sure the belt does not bunch fabric near the holster opening or cause discomfort when seated.
- Measure belt width and thickness before buying a holster or belt
- Choose belts made for concealed carry with reinforced cores
- Match clip size exactly to your belt; avoid “universal” clips
- Inspect your belt regularly for wear, cracks, or loose stitching
- Replace belts every 6 to 12 months depending on use and condition
- Test holster attachment on belt before wearing it all day
Replace or upgrade your concealed carry belt if you notice any sagging under the firearm’s weight, visible damage to the belt or its stitching, or if holster clips fail to seat securely and consistently. Pricing varies widely; quality belts range from $50 for entry-level options to $150 or more for those with reinforced cores and premium materials. Investing in a dedicated concealed carry belt ensures support for your holster and firearm, preserves posture, and keeps your appearance professional with a tucked-in shirt. Avoid belts designed only for fashion or casual wear, as they usually lack the required stiffness and support needed for safe daily carry.
Shirt and Clothing Choices That Improve Concealment
Choosing the right shirt fit is essential for concealed carry with a tucked-in shirt. Shirts with a trim or slim fit provide less excess fabric to bunch up around the firearm, reducing printing and discomfort. A shirt slightly larger than your standard size can offer extra room to accommodate the gun without pulling tight, but too loose a fit may cause noticeable bunching, especially when sitting or moving. A well-fitted button-down made of medium-weight cotton blend fabrics balances breathability and enough stiffness to drape naturally over your firearm, preventing obvious outlines.
Fabric type influences concealment by affecting how the shirt hangs and moves. Thicker, non-stretch woven fabrics like oxford cloth or poplin maintain shape better than thin, stretchy knits, which tend to cling and highlight the gun’s contours. Matte finishes avoid unwanted reflections under office lighting that can draw attention. Avoid very lightweight or sheer materials, especially in warm weather when perspiration can make the fabric stick to the holster or grip.
Layering underneath your tucked-in shirt can improve concealment and comfort. A lightweight undershirt made of moisture-wicking fabric helps reduce friction and sweating, preventing fabric from sticking to the holster. Over that, a thin, untucked vest or waist-length sweater applied in cooler environments breaks up the firearm’s outline and provides additional fabric volume to absorb gun bulk. Under formal jackets or blazers, these layers help keep the shirt taut over the holster, especially when seated. Keep layers slim to avoid restricting movement or adding bulk that prints in tight professional attire.
Controlling bunching or printing involves how you arrange your garments and adjust your posture. Always ensure the shirt is fully tucked in and smooth out folds around the firearm area before sitting down. When seated at a desk or driving, lean slightly forward to increase shirt clearance and create space for a smooth draw. Shirts made from fabrics with a slight stretch give some forgiveness for movement, but shirts with minimal elasticity hold their shape better. Using a holster designed with adjustable cant and ride height lets you customize how the firearm sits, optimizing concealment and access.
In high-mobility situations, such as walking through busy office environments or navigating stairs, a shirt with a blend of polyester and cotton resists wrinkling and maintains coverage over the firearm, which is critical to avoid unintentional revealing. Shirts with a longer tail length prevent untucking during frequent bending or reaching.
Investing in quality shirts that fit well initially might cost $30 to $70 each, depending on brand and material. Layering items generally add another $20 to $50 per piece. These choices take modest time to test for fit and comfort but pay off by reducing the risk of printing and making your daily carry experience professional and unobtrusive. Poor fabric choices or ill-fitting shirts lead to visible gun outlines, discomfort, and even safety hazards from fabric interfering with the trigger guard during re-holstering. Regularly practising draw movements from a seated position while wearing your chosen clothing helps identify problem spots and allows adjustments before real situations arise.
Drawing and Re-Holstering Techniques with a Tucked Shirt
Drawing and re-holstering with a tucked shirt requires precise hand coordination and deliberate control to maintain concealment and avoid snags. Using your support hand to manage the shirt fabric while drawing with your strong hand allows a smooth, quick, and safe presentation. Re-holstering demands careful shirt clearance and slow, purposeful movements to prevent unsafe contact with the trigger guard.
One-Handed Draw Method
Drawing quickly without prematurely untucking your shirt starts with your strong hand while managing fabric tension through muscle memory. A holster positioned securely at your preferred carry spot, commonly 3 to 4 o’clock on the strong side, supports an efficient one-handed draw. This technique benefits from consistent practice, focusing on friction control and clean grip access to avoid snagging the shirt.
- Reach your strong hand toward the firearm’s grip without pulling the shirt away yet.
- Establish a firm firing grip while your hand presses slightly against the fabric to create minor separation.
- Using finger strength, pull the firearm upward smoothly, allowing the shirt fabric to part naturally, avoiding full untucking.
- Clear the holster edge calmly and bring the gun into your shooting position.
- Focus on consistent positioning with each draw to speed muscle memory development.
Don’t rush this draw; a smooth, controlled motion reduces snag risks and maintains concealment under a tucked shirt.
Assisted Draw Using Support Hand
Your support hand plays a important role in controlling shirt fabric for a cleaner draw, especially when one-handed clearance is difficult. Lift the shirt vertically just enough to expose the grip, allowing the firing hand to engage the firearm promptly. This method balances concealment and speed and is essential when wearing dress shirts that cling or resist movement.
- Place your support hand on the shirt fabric just above the holster.
- Lift or pull the shirt straight up to reveal the firearm’s grip without untucking it entirely.
- Simultaneously, have your strong hand approach and secure the firing grip.
- Draw the firearm smoothly while your support hand holds the shirt clear.
- Practice timing so both hands work together without hesitation.
Practice this two-handed draw routinely to eliminate delays and prevent accidental exposure or snagging.
Safe Re-Holstering Procedures
Re-holstering under a tucked shirt requires extra attention to shirt clearance and trigger safety. The safest method involves fully lifting or untucking the shirt to clear any fabric from the holster area. Using the support hand to hold the shirt out of the way lets your strong hand re-holster slowly and deliberately. Avoid one-handed re-holstering without clearance to prevent accidental discharges or catching the shirt on the trigger guard.
- Bring the firearm toward the holster in your firing hand with control and attention.
- Use your support hand to lift or untuck the shirt fully above the holster.
- Clear all fabric away from the holster mouth and trigger guard area.
- Begin inserting the muzzle into the holster slowly while ensuring no obstruction.
- Push the firearm down fully until seated securely in the holster.
- Release the shirt back down smoothly for concealment.
Never attempt to re-holster without first clearing the shirt; safety depends on avoiding fabric or finger contact with the trigger.
Managing Safety and Trigger Guard Coverage Under Tucked Shirts
Trigger guard coverage is essential when carrying concealed with a tucked-in shirt. Ensuring the holster fully covers the trigger guard prevents accidental discharge risk by blocking access to the trigger. You must check this coverage every time you gear up, especially since the tucked shirt might shift and interfere with the holster’s function. Proper trigger guard coverage provides peace of mind that the firearm won’t fire unintentionally, which is critical in professional environments where safety and discretion are important.
Before your day starts, perform a thorough safety check. First, examine the holster fit, make sure the firearm seats fully and securely without excessive movement. A good holster retains the weapon firmly while allowing a smooth, controlled draw. Next, inspect the trigger guard area for complete and consistent coverage; if the guard is exposed or the holster mouth collapses, the setup is unsafe. The leather should not intrude into the trigger guard or catch on the trigger. Check the holster’s attachment points for any loose screws or worn clips. Wear signs like material cracking, fading, or deformation signal the need for replacement or professional attention.
- Confirm the holster fully covers the trigger guard with no gaps
- Verify the holster retains the firearm securely without excessive play
- Inspect holster mouth for collapse or distortion that exposes the trigger
- Look for leather or fabric intruding into the trigger guard area
- Check attachment hardware for wear, looseness, or damage
- Beware of any holster material that catches or drags during draw or re-holster
- Use only holsters designed specifically for your carry position and firearm model
Holster retention failure can develop gradually or suddenly. You should address changing retention immediately when it differs noticeably from initial use, whether it feels weaker or tighter. Poor retention may cause the firearm to shift inside the holster, which makes the trigger guard vulnerable under a tucked shirt. Routine replacement is typical; holsters from quality manufacturers often cost between $50 and $150. When your holster shows clear signs of deterioration earlier than expected, consider filing a warranty claim or talking to a professional holster maker or gunsmith.
When shirt fabric gets caught between the trigger and holster during re-holstering, the risk of negligent discharge rises sharply. To reduce this risk, stash or smooth your tucked shirt to avoid folds entering the holster. Slow, deliberate re-holstering practice is important. Stop using the holster if fabric regularly jams or the holster’s mouth collapses. Seeking advice from the manufacturer or a trusted expert helps verify whether adjustments, repairs, or a different model better suit your concealed carry style.
Common mistakes include using non-holster pocket carry, failing to do routine safety inspections, or ignoring wear signs. Carry owners sometimes trust worn holsters beyond their lifespan. Others underestimate how much the tucked shirt can interfere during re-holstering. Staying vigilant with your holster’s condition and trigger guard coverage under a tucked shirt is the best defense against safety incidents in professional settings.
Common Concealed Carry Mistakes with Tucked Shirts and Fixes
Printing happens when the outline of your firearm shows through your shirt, often due to tight or light-colored clothing. This becomes visible if the gun is positioned incorrectly or if the shirt fabric is too thin. Switching to a dark, loose-fitting shirt with enough room to wrinkle slightly over the holster reduces printing. Also, choosing a holster with multi-point belt attachments and proper ride height helps keep the shirt stable and minimizes fabric movement that can betray the concealment.
Holster instability or discomfort usually results from using a poorly fitting holster or an insufficiently sturdy belt. Holsters without multiple belt attachment points shift during movement, causing bunching or snagging of the shirt. A reinforced gun belt designed for concealed carry supports the holster firmly, improving comfort and stability throughout the day. Without this, the holster may tilt or tug on the waistband, leading to visible bulges or awkward printing.
Fabric bunching and snagging occur when the shirt or undershirt doesn’t lie smoothly over the holster area. Tight or thin shirts tend to bunch up or catch on the holster edges as you move. To fix this, use concealment undershirts or holster shirts specifically designed to smooth the area and hold the fabric in place. Slightly loosening the tuck and ensuring the shirt is properly ironed can also reduce fabric catching. Keeping the shirt layered correctly helps maintain a neat appearance without sacrificing concealment.
Slow or unsafe draws often result from placing your holster poorly or having clothing in the way. Keeping your holster around the 1 to 2 o’clock position (appendix) or between 3:30 and 4 o’clock (strong-side) lets you access your firearm faster and more naturally. Shirts tucked too tightly or extra-large belt loops can get in the way and slow your draw. Try drawing your firearm while wearing your usual clothes, then adjust your tuck or angle so your hand can reach the gun easily without snagging.
- Use a reinforced gun belt with proper holster attachment to avoid holster movement
- Choose dark, loose-fitting shirts to hide printing effectively
- Place the holster at 1, 2 or 3:30, 4 o’clock positions for optimal draw speed
- Use concealment undershirts on fitted days to prevent bunching and snagging
- Loosen shirt tuck slightly to reduce tight fabric pulling on holster edges
- Practice drawing regularly with tucked clothing to identify and fix snags or slow points
Small clothing adjustments can solve many concealment flaws. For instance, selecting a shirt with a stiffer fabric or wearing an undershirt with stretch can maintain smooth layers. Changing the tuck method to a straighter, neater fold versus a loose tuck minimizes excess fabric. These simple tweaks cost little but can improve comfort and concealment dramatically.
Carrying Extra Gear Alongside a Tucked-In Shirt Concealed Setup
Carrying extra magazines or accessories while wearing a tucked-in shirt can be challenging but manageable with the right approach. Most people who carry tucked-in prefer a flush-fitting magazine for their everyday carry, while their spare magazine often has increased capacity for added firepower. Positioning these extras so they remain concealed without printing under your shirt is key to maintaining a professional look.
Placing additional magazines in the waistband behind your pistol grip at the 3 o’clock or 9 o’clock positions usually works best. These areas allow the spare magazines to sit flat against the body, minimizing the chance of printing or creating an awkward bulge under the shirt. If you use a magazine carrier or holster with a J-clip, it helps by creating space to tuck your shirt securely behind the holster, allowing for more comfort and improved concealment.
When choosing holsters or carriers for your spare magazines, look for slim, low-profile designs specifically made for tucked-in carries. Mag carriers with adjustable retention clips can be moved slightly forward or back to find the perfect balance between concealment and quick access. Some carriers attach to the belt, freeing up space inside your waistband and reducing discomfort during long periods of wear.
Carrying multiple accessories alongside a tucked-in shirt often means opting for slightly larger shirts or those made from materials with more give. This extra room prevents your carry setup from looking bulky or untidy. However, too loose a shirt risks printing or catching on your firearm, so aim for a fit that’s tailored but not tight.
Alternative methods for carrying extra magazines include using a pocket holster inside a suit jacket or a discreet, slim pouch clipped to your belt. These options avoid crowding your waistline but require a jacket to remain concealed effectively. They also give you added flexibility on days when wearing a tucked shirt isn’t enough to keep your gear concealed.
Comfort can be a major concern when adding extra gear to a tucked-in carry. To maintain comfort, position magazines where the belt and waistband provide firm support without pinching. Periodically shifting the magazine carrier’s location slightly can reduce pressure points throughout the day. Testing your full setup during movement and sitting before heading out helps identify any printing or discomfort early.
Always try sitting, bending, and reaching while wearing your full carry setup under a tucked shirt to check for printing or discomfort before committing to that method for a day.
Your First 30 Days: A Quick-Start Plan for Tucked-In Concealed Carry
Follow this plan to build consistent, comfortable, and safe concealed carry habits with a tucked-in shirt.
- Day 1: Select a holster designed for inside-the-waistband carry that fits your firearm snugly. Confirm it stays secure when you move and the shirt lays flat over it.
- Day 3: Try different carry positions, appendix, strong-side hip, or behind the hip, to see which conceals best under your shirt without printing.
- Week 1: Wear a sturdy, reinforced carry belt to support your firearm’s weight and keep the holster steady. Your belt should not sag or twist throughout the day.
- Week 2: Adjust shirt fit and fabric choices for comfort and concealment. Lightweight, non-clingy fabrics help hide the firearm’s shape without bunching.
- Week 3: Practice your draw and re-holstering techniques slowly, ensuring the trigger guard remains covered and your movements stay smooth with your tucked-in shirt.
- Week 4: Add essential gear like a spare magazine in a slim pouch to your setup. Confirm your shirt still conceals all gear without restricting movement.
- After 30 Days: Evaluate your entire system for comfort, concealment, and safety. Make small tweaks to gear or clothing as needed to maintain confidence and readiness.
Frequently Asked Questions
Can You Carry a Concealed Firearm Tucked in Without Printing?
Yes, using a tuckable holster designed for minimal printing lets you conceal effectively under a tucked shirt. Proper holster position and clothing choices also reduce firearm outline visibility.
What Is the Safest Holster Type for Concealed Carry with a Tucked-In Shirt?
A holster that fully covers the trigger guard and secures the firearm during movement is safest. It must allow for consistent draws without compromising concealment or comfort.
How Do You Keep the Firearm Comfortable When Tucked Under a Shirt All Day?
Position the holster at 3:30 to 4 o’clock on your strong side for balance between concealment and comfort. Adjust holster cant and belt tightness to reduce discomfort during long wear.
Can I Carry a Firearm Tucked in During Formal Events?
Yes, carrying tucked during formal events is practical using slim-profile holsters and unrestrictive dress belts. An extra layer like a jacket can help maintain concealment.
How Should I Practice Drawing the Firearm When Wearing a Tucked-In Shirt?
Practice drawing with your holster fully covered by your tucked shirt to improve speed and minimize printing. Use timed drills with a shot timer app for consistent skill development.
Is Appendix Carry Recommended with a Tucked-In Shirt?
Appendix carry is possible using a holster designed for tucking, equipped with a claw that angles the grip toward your body to lessen printing and improve concealment.
Wrapping Up
Consistent practice with the right gear and clothing makes carrying concealed under a tucked-in shirt practical and safe. Focus on smooth draws, solid belt support, and shirt fit to stay comfortable and concealed. Start by selecting a holster and belt combination that fits your daily routine, then build good habits around them.