How to Align a Rifle Scope for Perfect Accuracy: 8 Essential Steps Explained
How to align a rifle scope involves carefully mounting and leveling the scope to ensure accurate shots. Proper alignment means your reticle and rifle barrel are perfectly in line, preventing errors like cant-induced misses. Start by mounting the scope level to the rifle using a bubble level or plumb line to avoid off-target impacts downrange.
Key Takeaways
- Use a bubble level system or plumb line to ensure your rifle scope is perfectly level during mounting.
- Tighten scope rings with a preset torque wrench to apply the right pressure without damaging components.
- Align the reticle vertically with a professional reticle leveling system for improved shot precision.
- Check and adjust eye relief to prevent scope shadowing and maximize sight picture clarity.
- Set up a stable shooting rest to reduce movement and maintain consistent scope alignment when zeroing.
- Be aware that even 1° of scope or rifle cant can cause an 8-inch miss at 1000 yards.
1. How to Mount and Level Your Rifle Scope Correctly
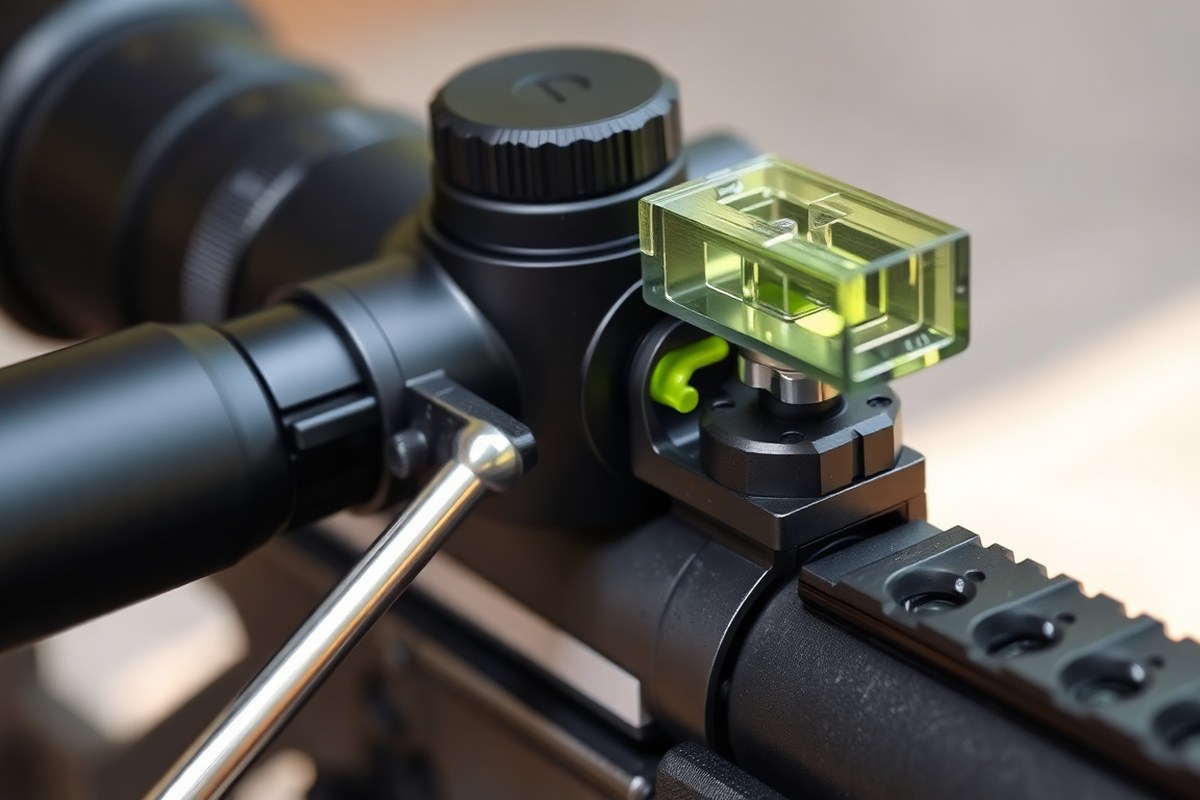
Properly mounting and leveling your rifle scope ensures accurate shooting and prevents costly errors like canting that can throw off your aim. Using the right rings and bases, you secure the scope in line with the barrel, then carefully adjust eye relief and confirm the reticle is perfectly vertical. Applying consistent torque to the mounting screws prevents distortion and loose connections, which can negatively affect zero retention over time. A bubble level is essential for aligning the scope and rifle body, providing a true horizontal reference and avoiding canting errors that cause shots to drift. Follow these steps for a secure and level mount with the correct torque:
- Select quality rings and bases that match your rifle and scope dimensions. Attach the base to your rifle using the manufacturer’s recommended screws and torque specs.
- Place the bottom halves of the rings on the bases and hand-tighten only. Set the scope into the rings, adjusting it forward or backward to achieve proper eye relief, usually about 3 to 4 inches from your eye.
- Level the rifle horizontally by supporting it in a stable rest or vice. Use a bubble level on the rifle receiver to ensure the barrel and receiver are perfectly horizontal.
- Align the scope reticle vertically by carefully rotating the scope inside the rings until a bubble level placed on the turret shows no tilt. This step prevents canting and misalignment of the reticle.
- Secure the top ring halves over the scope and begin tightening screws in a cross-pattern to ensure even pressure. Use a torque wrench set between 15 and 18 inch-pounds to avoid over or under-tightening the screws.
- Recheck the bubble levels on both the rifle receiver and the scope turret to confirm they remain aligned after tightening.
- Perform a final visual inspection and confirm the eye relief and scope adjustments feel comfortable and consistent for your shooting position.
Applying torque within the 15 to 18 inch-pounds range on ring screws is critical to avoid distorting the scope tube or loosening under recoil. Tools like the Wheeler FAT Wrench, available in professional mounting kits priced around $110, help maintain proper and repeatable torque values for consistent results. Using a bubble level on both the rifle and the turret guarantees that your reticle stays upright and elevation adjustments go straight up, eliminating errors due to rifle cant. Without this careful alignment, your shots can drift off target, especially at longer distances.
2. Essential Tools for Precise Rifle Scope Alignment

Essential tools like torque wrenches, bubble levels, laser bore sighters, and reticle leveling systems each play a key role in aligning a rifle scope precisely. They help ensure your scope is stable, correctly oriented, and aligned with the bore axis for accurate shooting. Choosing the right tools depends on your needs, budget, and the level of precision required.
Torque Wrenches for Screw Tightening
Tightening screws on your scope rings and mounts to the correct tension is critical to prevent damage or movement during use. A torque wrench specifically designed for riflescopes, such as the Stix™ Preset Torque Wrench Set costing around $99.99, ensures you apply consistent and proper torque according to manufacturer specifications.
Over-tightening can strip screws or damage the scope tube, while under-tightening might allow the scope to shift under recoil, ruining your zero. Using a preset torque wrench eliminates guesswork and protects your scope’s integrity over time.
Bubble Levels for Cant Prevention
Using a bubble level on both the rifle and the scope turret is essential to maintaining proper vertical and horizontal alignment. This prevents cant, the tilt of the rifle or scope, which can cause significant shot deviation, about 8 inches off at 1000 yards with just 1° of misalignment.
To use, place a bubble level firmly on the rifle’s action, then another on top of the scope turret cap. Adjust the rifle and rotate the scope until the bubbles center, indicating perfect leveling. Bubble levels generally cost less than $20 and are simple yet highly effective.
| Step | Tool Needed | Key Tip |
|---|---|---|
| Attach Rings | Screwdriver/Allen Wrench | Avoid overtightening |
| Position Scope | None | Keep scope loose initially |
| Level & Tighten | Bubble Level, Torque Wrench | Tighten screws evenly |
This table outlines a concise workflow using essential tools to mount and level your scope properly. Following these steps with the correct tools reduces errors and improves your scope’s mounting quality.
Do not overtighten scope ring screws; using a torque wrench helps avoid long-term damage to your scope.
Laser Bore Sighters for Speedy Zeroing
Laser bore sighters project a laser beam down the barrel to provide an initial reference point on your target. They are valuable for quickly bringing your optic close to zero without firing multiple shots. Prices range from $129.99 to $174.99 based on the model and features.
Start by securely resting your rifle, then insert the laser bore sighter into the muzzle or chamber as directed. Adjust your scope until the laser dot hits the bullseye on a target at short range. This step saves time and ammunition by reducing the scope adjustments needed at the range.
Reticle Leveling Systems
Reticle leveling tools, available around $65, are designed to ensure the crosshairs inside your scope are perfectly vertical and horizontal. They fit inside the scope tube and provide a visual reference to align the reticle accurately before tightening mounts.
Use the system by leveling your rifle first, then placing the reticle leveling tool inside the scope. Rotate the scope until the reticle aligns with the tool’s guides, ensuring the crosshairs match the rifle’s bore axis. This process avoids cant errors and improves shot consistency.
3. Setting Up Your Shooting Rest for Stable Scope Alignment
For precise rifle scope alignment, the stability of your shooting rest plays a critical role. A rest that offers excellent support minimizes rifle movement and absorbs recoil, ensuring each shot fires consistently at the intended point. Consistency in positioning helps reduce errors during zeroing and scope adjustments, improving your shooting accuracy by as much as 40%. Unstable rests or poor recoil management can cause the rifle to shift, skewing your zero and forcing repeated adjustments.
Choosing the right shooting rest depends on your setting and budget. A shooting bench provides the highest level of stability and recoil absorption, making it optimal for controlled environments like shooting ranges. Sandbags offer high stability and excellent recoil management at a lower cost and are more portable for field use. Bipods provide moderate stability and good recoil management but often require a stable surface. Foam rests, while affordable, typically deliver poor recoil absorption and low stability, so they are less recommended for precise alignment tasks.
| Rest Type | Stability Level | Recoil Management |
|---|---|---|
| Shooting Bench | Very High | Superior |
| Sandbags | High | Excellent |
| Bipod | Moderate | Good |
| Foam Rest | Low | Poor |
Begin by securing your rifle firmly in the chosen rest before mounting the scope. This prevents any movement that might misalign the reticle or scope rings during installation. Clean both the rifle and scope lenses to remove debris that can degrade accuracy. Fire three-shot groups from the stable rest to evaluate shot consistency, adjusting your scope turrets based on these results. Reducing the rifle’s recoil movement with a stable rest helps keep your point of impact steady, so each adjustment moves the reticle reliably without guesswork.
In field conditions, where a shooting bench may not be available, use a pair of heavy sandbags positioned under the fore-end and buttstock to absorb recoil and stabilize the rifle. Avoid lightweight or foam rests that allow the rifle to bounce or shift, which leads to inconsistent shot placement. For long-range precision, investing in a quality shooting bench or gun vise is worthwhile, allowing you to reliably zero your scope and maintain accuracy across sessions. Stability during alignment ultimately saves time and ammunition by reducing repeated adjustments caused by unintended rifle movement.
4. How to Focus and Adjust Your Scope’s Eye Relief and Reticle
Adjusting your rifle scope’s eye relief and reticle focus is key to achieving a clear, full sight picture and comfortable shooting position. Proper eye relief ensures no dark rings or shadows interfere with your view, while a sharply focused reticle improves aiming accuracy. Fine-tuning these settings helps you shoot confidently and consistently.
Adjusting Scope Position for Eye Relief
Eye relief refers to how far your eye is from the scope’s ocular lens while still getting a full, clear view. To determine the ideal eye relief, adjust the scope forward or backward on your rifle, keeping a natural, comfortable stance. Setting the right distance stops shadowed views and reduces the chance of getting hit by the recoil. Follow these steps to adjust eye relief precisely:
- Loosen the scope rings slightly so the scope can move forward and backward.
- Start with the scope pushed as far forward as possible.
- Raise the rifle to your normal shooting position.
- Slowly slide the scope backward toward your eye while looking through the lens.
- Stop when you achieve a full, clear sight picture with no black rings or vignetting around the edges.
- Ensure your eye stays naturally relaxed and comfortable in this position.
- Tighten the scope rings securely without shifting the scope’s position.
Good eye relief typically ranges from 3 to 4 inches with most rifle scopes but varies by model. Scout scopes have longer eye relief, roughly 9 to 13 inches, due to their mounting style. Proper eye relief reduces eye strain and helps with quick target acquisition.
Focusing the Reticle via Ocular Lens
The ocular lens on the scope has an adjustable eyepiece that focuses the reticle, the crosshairs or aiming point, so it appears crisp and sharp to your eye. A properly focused reticle prevents eye fatigue and improves aiming precision, especially at longer distances. To focus the reticle correctly, follow these steps:
- Hold the rifle in your usual shooting position, keeping your eye aligned with the scope.
- Look at a light-colored, neutral target such as a plain wall or a sheet of paper set 10 to 15 feet away.
- Rotate the eyepiece ring (ocular focus) slowly clockwise or counterclockwise.
- Continue adjusting until the reticle edges are sharp and contrast stands out clearly from the background.
- Stop adjusting when any further rotation causes the reticle to blur or distort.
This adjustment affects only the reticle’s focus, not the target image. It adapts the scope to your eye’s natural focus range, which varies between shooters. Some scopes feature adjustable parallax as a separate control; this step focuses solely on the reticle’s sharpness.
Confirming Clarity Using a Neutral Background
Reviewing your focus adjustments on a plain, solid background ensures the reticle is properly tuned without interference from distracting images. A cluttered or complex target can cause confusion or mask slight blurs in the reticle focus. Follow these verification steps:
- Place a white or light-colored flat surface at a comfortable distance, ideally indoors or in shade.
- Look through the scope and check that the reticle stands out clearly against the background.
- Verify the edges of the reticle are crisp, with no fading, doubling, or shadowing.
- Ensure the eye relief position still provides a full, uninterrupted sight picture.
- Lock all scope adjustments firmly once clarity and eye relief are confirmed.
Good results include a sharply defined reticle over a clean background with comfortable eye relief. Poor focus feels like soft edges or ghosting on the reticle, which can cause aiming errors. Clear vision helps the reticle align precisely with your intended point of impact, improving shooting accuracy.
5. Step-by-Step Zeroing of Your Rifle Scope at the Range
Zeroing your rifle scope involves setting the reticle so your point of aim matches the bullet’s point of impact at a specific distance. Start by choosing the appropriate zero distance based on your shooting needs, then fire groups of shots to measure where bullets land. Use the elevation and windage turrets to adjust the reticle position toward the average impact point. Repeat shooting and adjusting until your shots consistently cluster around the target center.
Choosing Your Zero Distance
Most shooters zero their rifle scope at 100 yards because this distance balances bullet trajectory and practical shooting scenarios well. Zeroing at 100 yards means your bullet’s highest point of crossing the line of sight occurs around this range, providing reliable accuracy for hunting and target shooting.
Some rifles, like AR-style models with taller scope mounts, benefit from a different zero distance such as 50 or 200 yards. Zeroing at 50 yards may be useful for close-range shooting or varmint hunting, while 200 yards is preferred for long-range shooting, ensuring smaller deviations up to that distance.
Choosing a zero distance should reflect how and where you’ll typically shoot. For example, if hunting in woodland areas with shots mostly under 150 yards, 100 yards is practical. Ensure your target distance matches your zero to avoid confusion during adjustments.
Firing Initial Group and Measuring Impact
Begin by setting up a target at your chosen zero distance, typically 100 yards. Fire a group of 3 to 5 shots, using a stable rest to minimize shooter-induced errors. This group helps you identify the average or center point where bullets hit.
Measure the group’s center relative to your aiming point. Use a ruler or target with a grid pattern for precise measurement. Note vertical and horizontal offsets in inches or MOA (minutes of angle). This initial grouping informs how much and in what direction to adjust your scope turrets.
Make sure each shot is deliberate and steady; inconsistent shooting introduces errors in zeroing.
Adjusting Elevation and Windage
The elevation turret adjusts bullet impact vertically, while the windage turret moves it horizontally. Use your scope’s specifications, most turrets adjust by 1/4 MOA per click, meaning one click moves the point of impact roughly 0.26 inches at 100 yards.
Calculate the needed number of clicks. For example, if your group lands 2 inches to the right and 1 inch low at 100 yards, adjust windage 8 clicks left (2 ÷ 0.26 ≈ 8) and elevation 4 clicks up (1 ÷ 0.26 ≈ 4). Turn turrets slowly and deliberately, noting direction indicated on knobs.
After adjustments, look through the scope to ensure the reticle has moved toward where your shots landed. The reticle should shift opposite the adjustment direction relative to bullet impact due to lens mechanics.
Confirming and Fine-Tuning Zero
Fire another 3 to 5 shot group at the same distance to confirm your adjustments were correct. The new group should cluster closer to the target’s center. If not, repeat measuring and adjusting the turrets in smaller increments to fine-tune.
Consistency in group size and placement indicates your zero is set. A tight 1 to 2-inch group at 100 yards is ideal for most recreational shooting and hunting. Record your final settings and consider testing at different distances to understand your bullet trajectory fully. Remember, environmental factors like wind and temperature can affect bullet impact, so zeroing in calm conditions is preferable for accuracy.
- Set a target at your chosen zero distance (usually 100 yards).
- Fire a stable 3 to 5 shot group, aiming consistently at the same point.
- Measure the average group point of impact relative to the aimed point.
- Calculate required turret adjustments (clicks) based on your scope’s MOA per click.
- Turn the elevation and windage turrets accordingly, moving the reticle toward the group center.
- Fire another group to confirm the new point of impact is near your target’s center.
- Make fine incremental adjustments if needed until consistent grouping on target is achieved.
6. Understanding and Preventing Scope Cant and Alignment Errors
Scope cant happens when the rifle scope tilts sideways instead of staying perfectly vertical, which changes the sight line away from the bullet’s vertical travel path. This misalignment creates big aiming errors, mainly in windage. Because the reticle no longer lines up with gravity, horizontal adjustments won’t match the bullet’s position, making shots drift unexpectedly. This problem often shows up if the rifle is held canted during shooting or if the scope was mounted without checking it was level.
To check for cant, start by mounting a bubble level on the rifle’s action or barrel, then place a second bubble level on the scope’s turret adjustment cap or along the scope tube. Check your levels on both the rifle and scope; different readings indicate the scope or rifle is not perfectly vertical. Another method is setting up a target at a known distance and firing a few rounds while carefully observing if the bullet impacts shift horizontally when you tilt the rifle slightly. Even a small cant angle can cause several inches of deviation at 100 yards.
For example, if you notice the level on the scope turret shows a 5-degree tilt while the rifle’s level is perfectly horizontal, this 5-degree cant will cause your point of impact to move left or right, depending on your scope adjustments. Because your adjustments assume a vertical reticle, your windage corrections will not work as expected. This will make zeroing the scope difficult and gun-firing inconsistent, especially at longer distances where the effect is amplified.
Preventing cant starts with careful leveling during installation. Use quality bubble levels and check both the rifle and scope independently for levelness. When mounting your scope, tighten rings evenly, verifying the reticle remains vertical using the level. During shooting, keep the rifle vertical and avoid canting your wrist or raising the rifle at an angle, as even a perfectly mounted scope will deliver off shots if you hold the rifle tilted.
Here is a checklist to avoid scope cant: First, clean your rifle and scope to remove any dirt that might affect mounting stability. Second, mount the scope and loosely tighten the rings. Third, place levels on the rifle’s action and the scope tube to confirm both are horizontal. Fourth, progressively tighten the rings while continually checking for cant. Finally, test-fire at the range, watching for sideways shifts in bullet impact and adjust as necessary. After spotting cant post-installation, loosen the mounting rings, reposition the scope properly, then tighten the rings securely.
Environment can also affect alignment. After heavy use or exposure to harsh weather, recheck your scope and rifle for cant, as vibration and temperature changes may cause subtle shifts. Storing your rifle in a padded case in a cool, dry place helps maintain consistent mounting integrity over time. Correcting scope cant prevents frustrating shooting errors and ensures your adjustments translate to real accuracy on target.
7. Troubleshooting Common Scope Alignment Problems
Shots consistently landing off-target after alignment often signal subtle issues with scope mounting or leveling. Examine the scope mounts first to check if they are securely fastened and properly seated on the rifle base. Loose or crooked mounts cause canting, where the rifle tilts slightly and throws off aim. Use a torque wrench to tighten screws to manufacturer specifications, usually between 15 to 25 inch-pounds depending on the mount. Ensuring the mounts fit both your rifle’s base and the scope tube diameter prevents mechanical stress that can shift the scope during recoil.
Loose mounts or shifting scopes typically result from improper tightening or incompatible parts. After tightening, test stability by gently wiggling the scope tube; it should remain rigid without any movement. When your scope shifts during recoil, try installing better-quality rings that resist recoil or apply thread locker to the mounting screws. Regularly inspect the mounts after shooting sessions, especially if you notice changes in your point of impact or group size.
A blurry or unfocused reticle post-mounting most often occurs because the eye relief or focus adjustment wasn’t properly set during installation. The scope’s ocular lens focus is adjustable; turn the focus ring while looking through the scope without aiming at a target until the reticle appears sharp. Adjust your eye relief by moving the rifle forward or backward until you achieve a clear sight picture with maximum field of view. This process may take a few minutes but is important for fast target acquisition and accuracy.
Re-level or re-zero your scope if you notice any of these issues during or after range sessions: shots consistently group off-center vertically or horizontally, the reticle appears tilted when the rifle is held naturally, or if the rifle endured a strong impact or disassembly. Reloading or transporting your firearm can slightly shift scope alignment, so performing a quick zero check every few hundred rounds or after significant handling is advisable.
An effective troubleshooting checklist includes these key steps: inspect and tighten mounts with a torque wrench, verify scope base and ring compatibility, adjust ocular focus and eye relief precisely, and confirm the rifle and scope maintain a level position using a bubble level. Investing in quality mounting hardware, which may cost $50 to $150 depending on brand and style, reduces problems. Good results show tight, stable mounts, a crisp reticle with no blur, and bullet impacts matching your point of aim within your chosen zero distance, typically 100 yards. Should problems continue after these steps, talk to a gunsmith to inspect the rifle’s base or barrel alignment for mechanical issues that might impact accuracy.
8. How Often and When Should You Realign or Check Your Scope?
Checking your rifle scope alignment quarterly is a reliable maintenance schedule to keep your accuracy consistent. Environmental factors like temperature shifts can cause your scope’s materials to expand or contract, leading to subtle changes in your point of impact. For example, steel or aluminum components may shift slightly when temperatures vary between 20°F and 90°F, which is common outdoors. Weather conditions such as humidity and rain can also affect the optics’ clarity and, indirectly, your ability to judge precision shots.
After transporting your rifle, especially if it’s fitted with a long-range scope, always inspect and realign the scope before shooting. Re-zeroing is generally required after dismounting the scope because tightening and loosening the rings can alter the scope’s position. To confirm your zero, set up a target with gridlines at your usual zeroing distance, typically 100 yards for recreational shooters. Fire a group of three shots, then check if the impact points still fall within your expected zero zone. A shift greater than half an inch at 100 yards suggests your scope needs adjustment.
Indicators that your scope needs realigning include consistent misses in the same direction from your point of aim, unexpected shifts after shots, or visible loosening of scope rings. Also, dirt or residue on the lenses can cause visual distortion that mimics alignment errors, so keeping optics clean is part of routine checks. Use a stable rest and ensure your rifle remains level in the vise since any cant on the rifle can throw off your alignment. Realignment may take only 10 to 20 minutes with basic tools like a torque wrench, bubble level, and a solid shooting rest.
Start by verifying the rifle is level in your rest, then check if the reticle is vertical using a bubble level on the flat edge of the scope tube or reticle. Next, bore sight or confirm your zero at the range by adjusting windage and elevation turrets as needed. Regularly inspecting your scope often costs nothing aside from time but replacing worn rings or mounts may range between $30 and $100. Maintaining consistent zero prevents frustration and missed shots during recreational shooting or hunting.
Always double-check that your rifle is level before adjusting scope alignment to avoid introducing new errors.
Step-by-Step Action Plan for Aligning Your Rifle Scope
Follow these steps to align your rifle scope correctly and improve your shooting accuracy. Each step ensures you build a solid foundation before moving on.
- Before you start: Gather essential tools like a gunsmithing screwdriver, torque wrench, and scope leveling kit to prepare for precise alignment.
- Day 1: Mount the scope securely on your rifle with proper eye relief and use a level to ensure the scope is perfectly horizontal. Confirm there’s no cant by checking the gun’s alignment with a shooting rest.
- Day 2: Focus the reticle by adjusting the ocular lens until the crosshairs are sharp. Verify the reticle is centered and does not shift when you move your eye side to side.
- Range session 1: Zero your scope at 25 yards by shooting groups and adjusting windage and elevation knobs. Verify the point of impact matches the crosshairs.
- Range session 2: Confirm zero at 100 yards or your preferred distance. Fine-tune adjustments for precise impact, and check for any cant during shooting.
- After 1 week of use: Inspect the mounting rings and screws for tightness and check the scope alignment again to ensure no shifts occurred during handling.
- Monthly check: Clean your scope lenses and verify all adjustments remain true, especially after extreme weather or heavy use, to maintain accurate alignment.
Frequently Asked Questions
What Is the Best Way to Bore Sight a Rifle Scope?
Bore sighting involves aligning your scope with the rifle’s bore before live firing, saving time and ammunition while ensuring initial accuracy. Use a laser bore sight or a mechanical bore sight tool for precise alignment.
Can Improper Torque on Scope Rings Affect Alignment?
Yes, using incorrect torque on scope rings can distort the scope tube, causing misalignment. Always use a calibrated torque wrench to tighten screws evenly to the manufacturer’s specifications.
How Do I Verify If My Scope Is Canted After Mounting?
Use a bubble level placed on the turret cap and the rifle’s action to check vertical alignment. Even 1° of cant can cause significant bullet impact deviation at long range.
Why Is Eye Relief Adjustment Important During Scope Alignment?
Proper eye relief prevents scope shadowing and ensures you have a full clear sight picture. Adjust it so you achieve the maximum field of view without moving your head awkwardly.
Can Temperature Changes Impact Rifle Scope Alignment?
Yes, extreme temperature changes can cause materials in the scope and mounts to expand or contract, affecting zero. Check and realign your scope if shooting conditions vary widely in temperature.
What Mounting Accessories Are Critical for Accurate Scope Installation?
Quality mounting rings and bases designed specifically for your rifle model are essential. They provide a secure, stable setup when paired with a proper torque wrench, reducing the chance of scope shift.
Key Points to Remember
Properly aligning your rifle scope ensures consistent accuracy and improve your shooting experience. Taking the time to mount, level, focus, and zero your scope carefully avoids common errors that reduce precision. Your next step is to test your setup in different shooting conditions to confirm the reliability of your adjustments. Regularly checking your scope alignment keeps your rifle ready for any shooting challenge.