How to Sight in Rifle Scope at 25 Yards: A Complete Guide for Precision
To sight in a rifle scope at 25 yards, start with a stable rest and bore sight the rifle to align the reticle with the barrel. Shoot a group at 25 yards then adjust the windage and elevation turrets to center your shots on the target. This method sets you up for an accurate zero at 100 yards, where the bullet will impact about 3 to 4 inches above the point of aim.
This approach suits new and intermediate rifle owners learning precision shooting. You’ll gain step-by-step guidance on choosing equipment, setting up, adjusting your turrets properly, and moving beyond 25 yards to finalize your zero.
Key Takeaways
- Start by firmly fixing your rifle in place and making sure the bore is properly lined up with the scope’s crosshairs before taking any shots.
- Use a low-magnification scope for easier target acquisition and initial sighting at 25 yards.
- Establish a stable shooting position with your rifle rested to ensure consistent shot placement.
- Fire a tight group at 25 yards to analyze shot patterns before making adjustments.
- Adjust the windage turret to move bullet impact left or right, and elevation turret for up or down.
- Expect your 25-yard zero to correspond to 3, 4 inches high at 100 yards, requiring further fine-tuning.
How to Sight in a Rifle Scope at 25 Yards

Sighting in a rifle scope at 25 yards sets the foundation for accurate shooting at greater distances. This process involves aligning the scope’s crosshairs with the bullet impact to ensure your shots hit where you aim. Accuracy at 25 yards allows you to verify that your scope adjustments work properly before moving on to your final zero distance, usually 100 yards for most rifles.
To sight in effectively at 25 yards, you need a secure setup and a systematic approach. Use a stable shooting rest to minimize movement and choose a target with a clear aiming point. Starting at low magnification on your scope helps maintain a wide view and easier target acquisition. After confirming a group on the target, adjust the windage and elevation turrets to move the point of impact to the bullseye.
- Mount and level your scope. Securely attach the scope to your rifle, making sure it’s properly aligned and leveled to avoid canting. Use a scope level if available to keep the reticle straight.
- Bore sight your rifle. Look through the bore from the breach end and adjust your scope’s reticle until it roughly aligns with where the barrel points at 25 yards. This “on paper” alignment avoids wasting ammunition.
- Set up a stable shooting position. Place your rifle on a solid rest or sandbags on a bench to reduce movement. Position your target exactly 25 yards away.
- Fire a three-shot group at the center of the target. Use low magnification and aim carefully. Keep the shooting consistent with controlled breathing and trigger pull.
- Assess the shot group on the target. Identify the center of your group and measure the distance from the bullseye. This shows how far off your initial zero is.
- Adjust the windage and elevation turrets. Turn the knobs according to your scope’s click value (typically 1/4 MOA per click) to move the point of impact toward the bullseye. For example, if your group is 2 inches low at 25 yards, raise the elevation turret about 8 clicks (since 1 click at 25 yards = approximately 1/4 inch).
- Repeat firing and adjustment cycles. Fire another three-shot group and adjust as needed until your group consistently lands on or very close to the bullseye at 25 yards.
- Confirm and note your zero settings. This 25-yard zero is not final but provides a good baseline. Record your turret positions and prepare to move the target to your longer sighting distance afterward.
Essential Equipment Needed for 25-Yard Sight-Ins
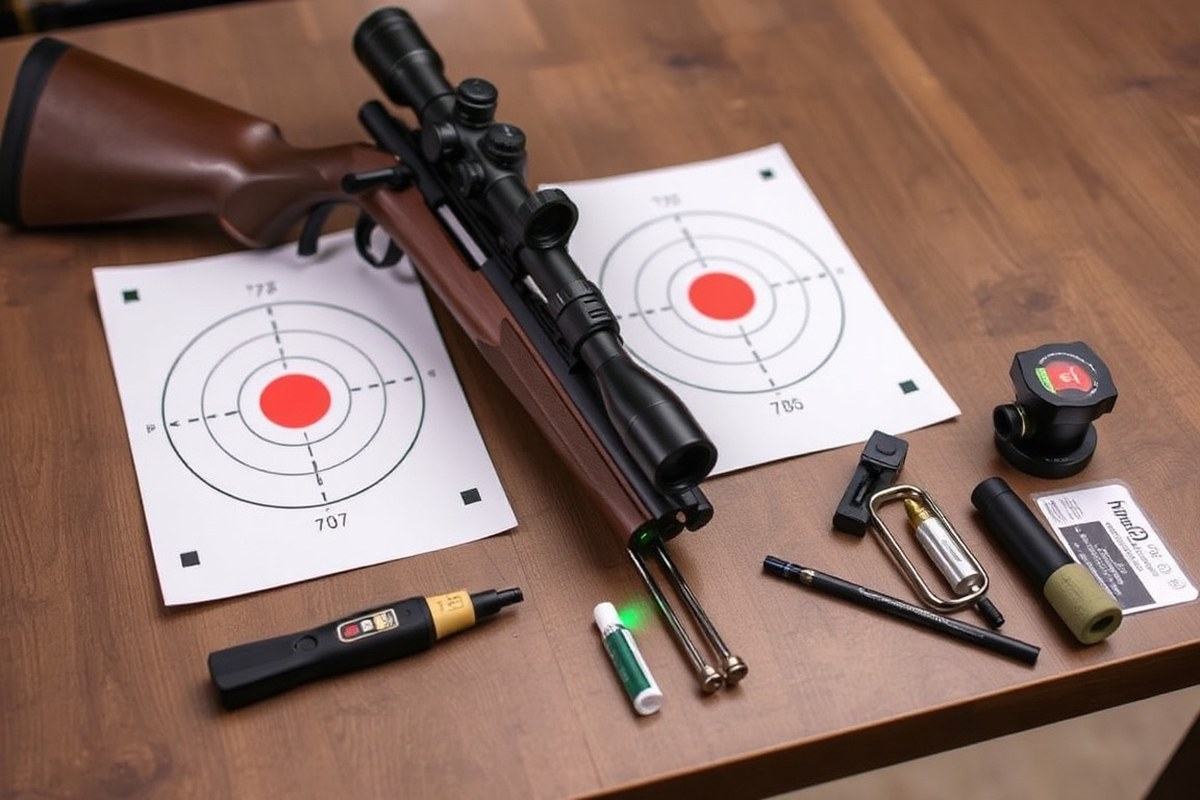
To sight in your rifle scope accurately at 25 yards, you need a specific set of tools and materials that enable precise alignment and adjustments. Central to this process is a laser bore sighter, which is not strictly necessary but highly recommended. It projects a laser beam from the rifle’s barrel, helping you line up the scope’s crosshairs with the bore before firing any live rounds. This step reduces wasted ammunition and time during live fire zeroing. If your rifle is a bolt-action, removing the bolt to visually center the target through the barrel offers an alternative bore sighting method, but a laser bore sighter offers more speed and ease.
Your target choice matters as well. Use a target designed for rifle zeroing that features a clear aiming point and marked measurement grids or rings. These markings let you gauge how far your shots land from your aiming point and calculate how much to adjust your scope. Setting the target exactly 25 yards from your shooting rest provides consistent conditions for sighting.
Ammunition selected should be consistent and representative of what you plan to use later when shooting at longer ranges. This consistency helps detect real scope adjustments rather than ammunition-related variations. Sight-in sessions typically use 3-shot groups to assess accuracy efficiently.
- Laser bore sighter for initial alignment
- Stable shooting rest or sandbags to steady the rifle
- Adjustment tools like a scope wrench or flathead screwdriver to turn windage and elevation turrets
- Rifle zeroing target with measurement grids
- Consistent ammunition matched to your rifle and typical shooting use
- Protective eye and ear gear for safety during live firing
Stabilizing the rifle is critical. Shooting from a steady rest ensures the group size accurately reflects your scope alignment rather than shaky positioning. Keep adjustment tools nearby so you can make quick turret changes after each group.
Always bore sight before firing live rounds to save ammo and speed up the zeroing process.
Costs vary: a laser bore sighter generally costs between $30 and $100, while quality shooting rests range from $40 to $150. Zeroing targets often come in packs for under $10. Investing in these tools streamlines your sight-in and helps you achieve a precise zero within 10 to 20 rounds at 25 yards.
Why Start Sighting Your Scope at 25 Yards?
Sighting your rifle scope at 25 yards offers a practical and efficient way to start zeroing before moving to longer ranges like 100 yards. This shorter distance reduces the variables that affect bullet trajectory, such as wind and bullet drop, allowing you to roughly align your scope with the rifle’s point of impact in a controlled setting. By starting close, you save time and ammo since initial adjustments can be made with fewer shots and less back-and-forth. Shooting indoors or at a safe nearby range is often possible at 25 yards, making this step accessible and convenient before heading outdoors for fine-tuning.
Zeroing at 25 yards works because many bullets follow a predictable trajectory path where the bullet’s rise and fall relative to the line of sight intersect twice: once at a shorter distance near 25 yards and again around 100 yards. For example, zeroing at 25 yards typically places your bullet’s point of impact slightly low or high at intermediate distances but aligns closely with the point of aim at 100 yards, assuming a standard rifle and cartridge like a .223 Remington. This means that sighting in at 25 yards lets you make initial scope adjustments knowing that the rifle’s bullet will cross your line of sight again farther out, reducing the guesswork of where your shots land at the rifle’s intended shooting distance.
A comparative example helps clarify this. Suppose you start sighting at 100 yards directly. You have to rely on more precise shot placement and environmental factors that affect trajectory, such as wind and bullet drop, which are more pronounced at this distance. Shots at 100 yards also risk causing more bullet damage to targets or backstops before the scope is roughly aligned. In contrast, 25-yard sighting shrinks these risks and lets you make broad corrections first. Once the scope’s reticle is close to the bullet’s impact point at 25 yards, you can then step back to 100 yards for fine adjustments. This two-step process saves time and money in ammunition and range costs.
Understanding the bullet’s trajectory pattern relative to 25 yards is key. At this close distance, the bullet has almost no drop from the muzzle’s level and is near its first point of intersection with the scope’s line of sight. After flying past 25 yards, the bullet rises slightly above the line of sight before dropping back to meet it again at 100 yards. Zeroing at 25 yards sets the scope so that this trajectory is accounted for, helping ensure your bullet impacts where you aim at typical hunting or target distances. However, note that variations in ammunition, barrel length, rifle type, and bullet weight can slightly change this trajectory, so a final check at your actual shooting distance remains necessary.
Costs and time commitments for this process are relatively low. You’ll typically need 20 to 30 rounds of consistent, low-recoil ammo to get a good group at 25 yards and make necessary windage and elevation adjustments. Using a stable shooting rest or bench helps keep your rifle steady to see the true bullet group. If good results look like a centered grouping around your aim point with minimal scope adjustment required when moving to 100 yards, then you have achieved an effective preliminary sight-in. Avoid rushing or ignoring shot group patterns, as poor grouping at 25 yards may indicate other issues such as improper mounting or inconsistent shooting technique.
Setting Up a Stable Shooting Position at 25 Yards
To create a consistent and stable shooting position at 25 yards, secure your rifle firmly on a reliable rest, align your body properly with the rifle, and control your breathing and trigger pull. These steps reduce sway and movement, ensuring repeatable accuracy during sight-in.
Choosing the Right Rest for Stability
Using the proper rest helps eliminate rifle movement, which is key for precise zeroing. Sandbags are a popular choice because they conform to the rifle’s shape, provide solid support, and usually cost under $30. They are easy to set up and adjust on shooting benches.
Mechanical rests, such as pedestal or bench rests, offer fine adjustment knobs to control windage and elevation. These can cost $100 or more but allow more precise holdover and can be useful if you plan to zero multiple rifles. Bipods provide front support but usually require a rear rest or steady hold behind the stock to prevent wobbling.
Make sure the rest you choose holds the rifle firmly without compressing or damaging the barrel or stock. The rest should not allow the rifle to tilt or slide when you squeeze the trigger. Stability here directly affects shot group consistency.
Body Posture and Alignment Tips
Aligning your body correctly with the rifle helps maintain the same shooting position shot after shot. Sit or stand so your shoulders align squarely behind the rifle. Lean forward slightly for a natural, balanced posture that avoids excessive tension in the arms and neck.
Keep your grip firm but avoid tight, shaky muscles. Rest your cheek comfortably on the stock to maintain consistent eye relief and prevent scope canting. Consistent cheek weld and eye position ensure the reticle lines up identically every time you fire.
Avoid twisting or leaning to one side. Both feet and hips should face the target as directly as possible. This stable stance reduces body sway that translates into inconsistent shots.
Controlling Breathing and Trigger Pull
Breathing affects rifle stability because chest and shoulder movement can shift your aim. Before taking a shot, exhale slowly and hold your breath just long enough to squeeze the trigger. Holding your breath for more than 7 or 8 seconds can cause muscle shaking, so time your shot carefully.
Apply smooth, steady pressure on the trigger rather than a sudden jerk. Abrupt trigger pulls cause you to move the rifle, throwing off your shot placement. Practice dry firing with your chosen rest to develop a gentle trigger squeeze and steady hold. Controlling breathing and trigger pull combined with a solid rest and proper body alignment produces reliable shot groups at 25 yards, giving you confidence to adjust your scope accurately.
- Set up your shooting rest or sandbags on a stable surface.
- Place the unloaded rifle on the rest, ensuring firm contact and no rocking.
- Adopt a comfortable posture with your shoulders square to the target and lean slightly forward.
- Rest your cheek on the stock to maintain the same eye relief each shot.
- Take a slow, steady exhale and hold your breath briefly before firing.
- Squeeze the trigger gently, avoiding any sudden movements.
- Repeat with consistent body position and support for each shot to build reliable groups.
Analyzing and Interpreting Your Shot Groups at 25 Yards
After shooting a group of rounds at 25 yards, the first step is to check the location and size of your shot group on the target. The group’s center tells you where your bullets are impacting compared to your point of aim. To measure the group center, find the midpoint between the highest and lowest shots vertically, and the leftmost and rightmost shots horizontally. This midpoint shows how far off-center your shots are, indicating whether you need to adjust windage (horizontal) or elevation (vertical) on your scope.
Measuring group size helps evaluate your shooting consistency and whether the adjustments you make improve precision. To calculate group size, measure the distance between the two farthest shots in the group, using the 1-inch grid on your target for accuracy. Smaller groups mean better consistency, although even tight groups need to be centered on the bullseye for an accurate zero.
After determining the group center relative to your aiming point, convert the measured offset to scope adjustments. Most scopes adjust in ¼ MOA increments, with 1 MOA equaling roughly 1 inch at 100 yards, or ¼ inch at 25 yards. For example, if your group center is 0.5 inches high and 0.5 inches left at 25 yards, that translates to 2 MOA high and 2 MOA left (since 0.5 inches ÷ 0.25 inches per MOA = 2 MOA). To bring the group to center, dial the elevation turret down 2 MOA (8 clicks) and the windage turret right 2 MOA (8 clicks), as elevation adjustments move impact vertically and windage move it horizontally. Each click shifts the point of impact ¼ MOA.
After making adjustments, fire another test group to verify the changes. The new group should move closer to the bullseye. If the shots are still off-center, repeat the measurement and adjustment process. Keep in mind that shot groups at 25 yards may be slightly different compared to longer distances due to bullet trajectory, so use these adjustments only for initial zeroing before confirming at 50 or 100 yards.
Consistently tight groupings near the bullseye indicate effective scope alignment and stable shooting technique. Large groups far from center suggest potential scope mounting issues, inconsistent shooting, or equipment problems, requiring further investigation before making scope adjustments.
Always double-check turret direction before dialing; turning the elevation turret up moves your point of impact down, and turning it right moves the impact left, which can be counterintuitive.
Adjusting Windage and Elevation Turrets Correctly
You adjust the windage and elevation turrets on your rifle scope by turning them in specific directions to move your bullet group to the desired point of impact. Each click changes the point of impact by a small increment, which depends on whether your scope uses MOA or MIL adjustments. At 25 yards, these increments translate to fractions of an inch, meaning you will need several clicks to move your group noticeably. Proper adjustment helps ensure your scope’s crosshairs align precisely with where your bullets hit.
Understanding MOA vs MIL Adjustments
MOA (minutes of angle) and MIL (milliradians) are angular measurements used to describe how much each scope click shifts your point of impact. For a scope with ¼ MOA adjustments, one click moves the point of impact approximately 0.25 inches at 100 yards. At 25 yards, which is one-quarter of that distance, each click shifts the point of impact by about 0.06 to 0.09 inches. MIL adjustments work differently; a scope with 0.1 MIL clicks moves the impact by roughly 0.36 inches per click at 100 yards, so at 25 yards, each click equals about 0.09 inches as well.
Because both MOA and MIL systems describe angular movement, the distance to the target affects how far each click moves the bullet hole on the paper. You need to adjust based on your exact distance, so the increments remain consistent with how far off your group is. This understanding ensures precise adjustments and prevents overcorrection.
Calculating Adjustment Clicks Needed
First, measure the distance your shot group is from your desired point of impact in inches on your target at 25 yards. For example, if the group is 1.8 inches low and you have a ¼ MOA scope, each click moves the impact approximately 0.09 inches at 25 yards. Divide 1.8 inches by 0.09 inches per click, which equals 20 clicks. You would then turn your elevation turret 20 clicks in the “up” direction to bring the group onto the bullseye.
Scopes with MIL adjustments require you to convert the inch measurement into centimeters since MIL units often use metric calculations. Suppose your group is 4.5 centimeters off vertically. One 0.1 MIL click moves the point of impact about 0.23 centimeters at 25 yards, so divide 4.5 cm by 0.23 cm per click to get roughly 20 clicks. Adjust the elevation turret accordingly. Shoot groups then adjust incrementally, usually 3 to 5 clicks per adjustment, then re-shoot to avoid large shifts that can complicate tracking exactly how your point of impact moves.
Scope Turret Directions Explained
The turrets on the top and side of your scope manipulate elevation (up/down) and windage (left/right). If your shot group hits left of your point of aim, adjust your windage turret towards the right. This moves the reticle to the right, shifting the point of impact to the right as well. Similarly, if your shots are low, turn the elevation turret upwards. This moves the crosshairs down relative to your point of aim, causing the bullets to hit higher on the target.
The general rule is to turn the turret in the direction labeled on the scope that corresponds to where you want the point of impact to move. For example, “UP” on elevation moves the impact point higher, “RIGHT” on windage moves the impact right. This matches what you see on the dial to how the bullets adjust on your target, simplifying the process once you understand the mechanics behind the turrets.
It’s important to make adjustments with small, consistent increments and check the results frequently. Large or rapid changes can cause confusion and could lead to overshooting your target zero.
When and How to Move Beyond 25 Yards for Final Zeroing
You can consider your 25-yard zero sufficient once your shots consistently group within a two-inch circle around the point of aim at that distance. This level of precision at 25 yards indicates your scope is correctly mounted and roughly aligned. At this point, it’s time to move to longer distances to refine the zero for true accuracy in real-world shooting scenarios. Doing so matters because bullet trajectory changes with distance, affecting point of impact due to gravity and velocity loss.
After zeroing your rifle at 25 yards, move on to 50 or 100 yards to verify and adjust your scope settings. Begin by shooting three-shot groups at 50 yards if space is limited; otherwise, shoot at 100 yards for a zero that suits common hunting or target distances. Pay close attention to where your shots fall compared to your aiming point. Use the windage and elevation turrets to correct any side-to-side or up-and-down shifts based on consistent shot patterns. For example, if your rounds fall 3 inches low and 2 inches left at 100 yards, turn the elevation turret up and windage turret right, following your scope’s click increments (usually ¼ MOA per click, about 0.26 inches at 100 yards).
Shooting beyond 25 yards introduces visible bullet drop and slight wind drift. Expect your rounds to drop several inches at 50 yards and more noticeably at 100 yards. The bullet’s trajectory is a curve influenced by gravity that starts flattening near the zero point, but drops below it afterward. This effect means a 25-yard zero often translates to a 100-yard zero within one to two inches of point of impact vertically, but the margin grows the farther you shoot beyond 100 yards. Environmental factors like wind, temperature, and altitude will also increasingly affect shot placement, which is why final confirmation at the distance you plan to shoot is essential.
The best approach is a staged zeroing timeline. After successful 25-yard sight-in, test at 50 yards on your next range trip, making small adjustments to tighten groups and correct holdover. Afterward, confirm again at 100 yards. Costs include extra range time and ammunition; expect to spend at least 10 to 20 rounds for full confirmation and refinement at longer distances. Good results show shot groups centered on the bullseye with minimal adjustments remaining, indicating your scope and rifle work well together under practical conditions.
Moving beyond 25 yards without a confirmed short-range zero risks wasted ammunition and unclear sight adjustments. Without that initial alignment, shots at 100 yards might land off paper, making it hard to know which way to tweak your turrets. Some shooters may prefer to zero directly at 100 yards, but starting at 25 yards saves time and ammo by narrowing the adjustment window quickly. For hunters or shooters planning to engage targets between 100 and 300 yards, progressing incrementally from 25 to 50 and finally 100 yards provides the best balance of accuracy and effort.
Avoiding Common Mistakes When Sighting at 25 Yards
Keeping the rifle perfectly still during a 25-yard sight-in is critical for consistent results. Moving the rifle between shots often causes shot groups to scatter, making it harder to interpret your adjustments accurately. Use a solid rest like sandbags or a bipod and take a firm but not overly tight grip to minimize movement. Also, avoid touching the trigger too hard, which can push the rifle off target.
Adjusting the turrets correctly means making deliberate, small changes and recording each step. Rushing to adjust windage or elevation without confirming your shot placement leads to overcorrections that waste time and ammo. Before turning turrets, visually confirm your group’s center relative to your aiming point. Use the turret’s marked increments, usually ¼ MOA or 1/10 mil clicks, and turn only one direction at a time to prevent confusion. Always note your adjustments so you can track progress and reverse changes if needed.
Lighting conditions and how you set up your target significantly impact visibility through the scope. Dim or direct overhead lighting can glare or cast shadows that obscure bullet holes, causing you to misjudge your groups. Place the target where the sun or range lights illuminate it evenly, ideally with the sun at your back or to your side. Use a target with a high-contrast bullseye, such as a black circle on white paper, to see bullet holes clearly. If lighting is poor, consider using a small flashlight or adjusting your shooting position rather than guessing your impact points.
- Use a stable shooting rest or bench to support the rifle.
- Keep your cheek weld and body position consistent.
- Make turret adjustments in small, measured increments.
- Double-check shot placement before adjusting turrets.
- Set your target in bright, even lighting to see hits clearly.
- Mark your progress and adjustments for easy reference.
Never move the rifle between shots; instead adjust the scope turrets while maintaining your shooting position to keep your zero process consistent.
Avoiding these common errors usually takes patience and preparation more than extra money. Basic shooting rests or sandbags often cost less than $20. A quality target stand or proper lighting can improve your sight-in efficiency without significant expense. Clear sight of your shot group and steady rifle positioning will save costly ammunition and frustrating repeat sessions. Focusing on these fundamentals improves your confidence and speed when zeroing your scope at 25 yards.
Maintaining Zero and Checking Scope Consistency After Sight-In
Checking your scope’s zero regularly and maintaining it properly ensures your rifle maintains consistent accuracy over time. Perform zero verification every three to five shooting sessions or whenever you suspect a change. Proper storage and handling reduce scope drift and keep your adjustments reliable.
Routine Zero Verification Procedures
Before heading out to shoot, test your zero by firing a quick three-shot group at 25 yards from your usual shooting position. Compare the group’s point of impact to your established zero target. Confirm the group remains within a tight cluster, ideally within 0.5 to 1 inch of your zero point. For added confidence, check the zero from multiple positions like standing and prone, especially if you plan to shoot in varied stances. If your shots start to stray beyond 1 inch from the zero point, it may signal scope movement or environmental effects causing drift.
Consistent checks like these take only a few minutes and will catch zero shifts early. Note your results in a simple log to track changes over time. This habit helps identify patterns, such as zero shifts happening after travel or temperature changes.
Storage and Handling Tips to Prevent Scope Drift
Store your rifle in a padded case in a stable, moderate environment, avoiding extreme temperatures or humidity that can affect scope components. Sudden cold or heat can cause metal parts to contract or expand, leading to zero drift. Keep rings and mounts tight without over-torquing, following manufacturer torque specifications to maintain scope alignment. Avoid dropping, bumping, or handling the rifle roughly; mechanical shocks often cause internal adjustments to slip.
Regularly clean your scope’s lenses with proper lens cloths and solution. Dirt or moisture doesn’t affect zero directly but can impair your ability to confirm it during sight-ins. Incorporate scope checks into your standard rifle maintenance routine at intervals of every 300 to 500 rounds or before important shoots to ensure mounts remain secure and screws haven’t loosened.
When to Recalibrate or Visit a Professional
Persistent zero shifts that don’t respond to turret adjustments may mean the scope’s internal parts are damaged or the mounting system is compromised. Also, if the turret clicks feel loose or inconsistent, or if the scope fogs internally, professional inspection and potential recalibration or repair are necessary. Quality scopes often hold zero well, but cheaper or heavily used optics might suffer wear.
Expect a professional recalibration to cost around $50 to $100, depending on the shop and service. You should also consider sending the scope for warranty repair if it’s under coverage. In any case, don’t rely on guessing adjustments once signs of permanent zero loss appear, especially for safety-critical shots or hunting applications.
Step-by-Step Action Plan for Sighting in Your Rifle Scope at 25 Yards
Follow these steps to quickly and accurately sight in your rifle scope at 25 yards and prepare for longer-range shooting.
- Before You Begin: Gather all your equipment, rifle, scope, stable rest (like a bench rest or sandbags), targets, and tools for adjusting your turrets. Make sure your rifle is unloaded and safety checks are done.
- Day 1: Set up your target at exactly 25 yards and ensure your shooting position is stable. Fire a three-shot group aiming at the center of the target to establish your initial impact point.
- Day 1 (After Shooting): Measure the average center of your shot group relative to the bullseye. Adjust your windage and elevation turrets according to your scope’s click value until the point of impact moves closer to the bullseye.
- Day 1 (Repeat): Fire another three-shot group to confirm your adjustments. Repeat turret adjustments as needed until your group is centered on the bullseye at 25 yards.
- Day 2 or Later: Check your zero by shooting at longer distances, such as 100 yards, to verify the initial 25-yard sight-in. Fine-tune your turrets at these distances based on bullet trajectory.
- After Fine-Tuning: Record your turret settings for future reference and mark them on your rifle or in a notebook. This helps maintain consistent zero and speeds up future adjustments.
- Ongoing: Periodically check your zero by shooting groups at both 25 and longer yards, especially after transporting your rifle or changing ammunition.
Frequently Asked Questions
How Do I Bore Sight My Rifle Before Shooting at 25 Yards?
Bore sight your rifle by looking down the barrel and aligning the scope’s reticle with where the barrel points. This helps get your shots on paper before fine-tuning your zero at 25 yards.
Can I Sight in My Rifle Scope Indoors at 25 Yards?
Yes, you can sight in indoors at 25 yards if lighting is sufficient and your rifle and ammunition are safe for indoor use. Ensure you have proper ventilation and a secure backstop for safety.
What Magnification Should I Use When Sighting at 25 Yards?
Use a low magnification setting to keep the target clear and the reticle steady. Low magnification helps maintain better control and easier adjustments when aligning your shots.
Why Is a Stable Shooting Rest Necessary When Zeroing at 25 Yards?
A stable rest reduces rifle movement, helping you produce consistent shot groups. Less movement means clearer data to accurately adjust your scope’s windage and elevation.
How Much Should I Adjust My Scope Turrets After Shooting at 25 Yards?
Adjust turret clicks based on where your shots land relative to the target center. Each click typically moves the point of impact a fraction of an inch at 25 yards, allowing you to dial your group to the bullseye.
Does Sighting in at 25 Yards Work for All Types of Rifles?
It works best for most rifles but is especially useful for those with low recoil or lower velocity rounds. High-velocity rifles may require additional adjustments at longer ranges for a precise zero.
Wrapping Up
Sighting in your rifle scope at 25 yards sets a reliable foundation for accurate shooting at longer distances. Start by establishing a clear point of impact with consistent shot groups and steady adjustments. The next step is to test your zero beyond 25 yards to confirm your scope’s accuracy and make any necessary fine adjustments before heading into the field or at the range.